Luminosity Masking: The Light Side
This is part one of a two part series on luminosity masking. The original Photoshop tutorial can be found on planetphotoshop.com and is entitled: Recovering Lost Highlight Detail, by Jim Patterson. Luminosity can be utilized for a great number of color and shade adjustments. Jim covers the basics, which should give you a good idea of the types of things you can do.
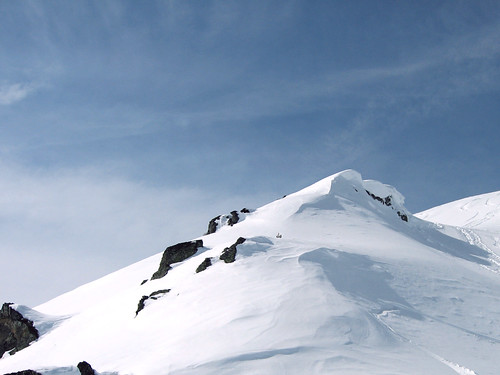
Okay, onward. The image for today is another CC licensed photograph found on flickr. It was originally posted by flickr user robad0b. Thanks! Please note that I don't actually think this photograph needs editing. I used it because it can highlight an extreme use of this technique. It is a very good photograph, and this technique is not going to make it better. It will however be good for illustrating the technique.
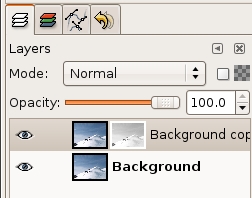
- Open your image, and make a copy of the background layer.
- Click Image>Mode>Decompose. Select the LAB radio button, make sure the Decompose to layers checkbox is checked and click OK.
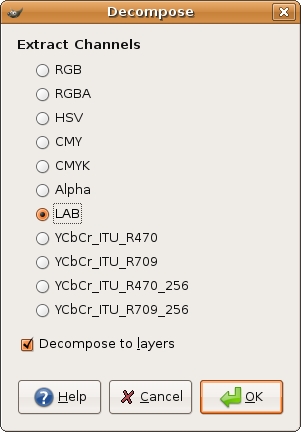
This will create a black and white copy of the photograph that probably looks pretty funky. - In the layers dialog, you'll see 3 layers A, B and L. We only want the L (luminosity) layer, so you may discard the other two.
- Select the entire layer (Ctrl-A) and copy it (Ctrl-C).
- Go back to the original photograph. Right-click the background copy layer and select Add layer mask. Initialize it to white (full opacity) and click OK. Now, paste the copied luminosity layer from the decomposed version onto this mask (Ctrl-V). Anchor the layer by right-clicking the floating selection and selecting Anchor layer. You should now have a black and white thumbnail next to the color thumbnail in the background copy layer.
- Now, we don't want to affect the sky with our luminosity adjustments, so we're going to mask it out by painting black over it on the mask. Right click the Background copy layer, and select Show layer mask. Use a soft brush, and carefully go over the edges of the sky with black.
Now you can either continue using the paintbrush, or use the freehand select tool to select the rest of the sky and fill it in with black.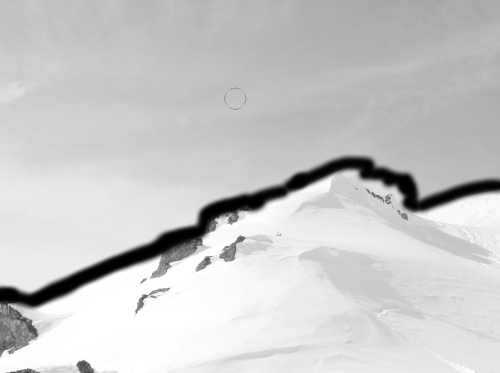
- The mask is now prepared, so on your layers dialog, right click the Background copy layer and select Apply layer mask. Here is what my masked layer looks like.
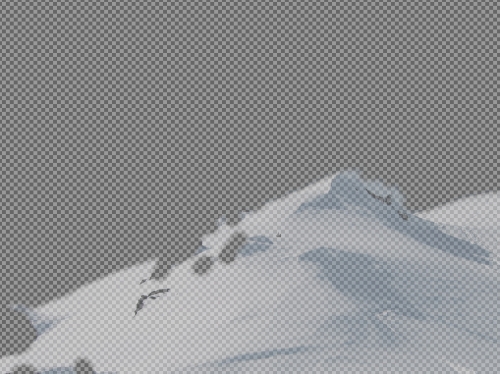
- Now for the adjustments. First thing, make sure Background copy layer is selected and change the layer mode to Multiply. Right away you will notice a big difference.
- The next few steps are really subjective. Here's what I'm going to do. First I'll reduce the opacity of the Background copy layer to around 50%. Then I went to Layer>Colors>Curves and bumped up the Value just a bit. Now, the rocks are too dark, so I'm going to erase the rocks from the Background copy layer using the eraser tool.

Now, you'll notice the area below and to the right of the rocks has a bit more detail, and the shadows are much more defined. I hope you've enjoyed this tutorial adaptation. Next time we'll finish up with The Dark Side.


10 comments:
what software do you use to capture the screen windows??
thanks
kirk
^^
Probably the GIMP itselft, or just pressing PrintScreen.
BTW, love these tutorials! Good work!
@kirk
In the main GIMP window: File->Acquire->Screen Shot
I used to use the gimp, but I figured out that if you press Alt-PrintScreen in Ubuntu, you get a screenshot of just the active window. That's how I got the screens for this tutorial. I think most major operating systems have an equivalent key combination.
Thank you for all your work on these tutorials. I think posts like this one would be more effective if you did start with a photo that needs the work. It's hard to tell why a person would want to do this procedure when the change between 'before' and 'after' is so subtle. (In fact, is it possible you have your 'before' and 'after' photos reversed? I think I see more detail in the first photo.) Seriously, I appreciate the work you are doing!
酒店喝酒,禮服店,酒店小姐,制服店,便服店,鋼琴酒吧,酒店兼職,酒店兼差,酒店打工,伴唱小姐,暑假打工,酒店上班,酒店兼職,ktv酒店,酒店,酒店公關,酒店兼差,酒店上班,酒店打工,禮服酒店,禮服店,酒店小姐,酒店兼差,寒暑假打工,酒店小姐,台北酒店,禮服店 ,酒店小姐,酒店經紀,酒店兼差,寒暑假打工,酒店小姐,台北酒店,禮服店 ,酒店小姐,酒店經紀,酒店兼差,寒暑假打工,酒店小姐,台北酒店,禮服店 ,酒店小姐,酒店經紀,酒店兼差,寒暑假打工,台北酒店,禮服店 ,酒店小姐,酒店經紀,酒店兼差,寒暑假打工,酒店小姐,台北酒店,禮服店 ,酒店小姐,酒店兼差,寒暑假打工,酒店小姐,台北酒店,禮服店 ,酒店小姐,酒店經紀,酒店兼差,寒暑假打工,酒店小姐,台北酒店,禮服店 ,酒店小姐,酒店經紀,酒店兼差,寒暑假打工,酒店小姐,台北酒店,禮服店 ,酒店小姐,酒店經紀,酒店兼差,寒暑假打工,酒店小姐,台北酒店,禮服店 ,酒店小姐,酒店經紀,酒店兼差,寒暑假打工,酒店小姐,禮服店 ,酒店小姐,酒店經紀,酒店兼差,寒暑假打工,酒店小姐,禮服店 ,酒店小姐,酒店經紀,酒店兼差,寒暑假打工,酒店小姐,禮服店 ,酒店小姐,酒店經紀,酒店兼差,寒暑假打工,酒店小姐,禮服店 ,酒店小姐,酒店經紀,酒店兼差,寒暑假打工,酒店小姐,酒店傳播,酒店經紀人,酒店,酒店,酒店,酒店 ,禮服店 , 酒店小姐,酒店經紀,酒店兼差,寒暑假打工,招待所,酒店小姐,酒店兼差,寒暑假打工,酒店上班,暑假打工,酒店公關,酒店兼職,禮服店 , 酒店小姐 ,酒店經紀 ,酒店兼差,寒暑假打工,酒店,酒店,酒店經紀,
免費視訊,煙火,煙火工廠,視訊,正妹視訊,真愛密碼,真愛密碼,煙火秀,煙火圖片,衣蝶,衣蝶,AV女優,AV女優,
煙火批發,小泉彩,小泉彩,情趣用品,鞭炮,live119論壇,蜂炮,視訊
uggs clearance Consumer Reports "ConsumerReports" The data show that this and increasing the car's safety performance was less than average, in 2011 the performance of the U.S. auto market in general. U.S. "Forbes car" recently Uggs Outlet announced the nine worst-performing models in 2011, listed in order of this list, Forbes consulted with three experts in car: Consumer Reports Senior Automotive Engineer Jake Fisher; car website Web2Carz Senior Correspondent Tim Healey; ugg boots clearance Detroit television host of online car John McElroy Ugg Bailey Button.
Inside theD3 Items levels dialogue, you will see A few tiers Some sort of, T as well as T. We merely want the actual D (luminosity) level, that serves Guild Wars 2 Itemsto throw away the other a pair of.
Good reading yyour post
Post a Comment