Convert RGB to Black and White
There is no one "right" way to convert color photographs from color to black and white. In fact there are tons of ways to do it, and they all have their advocates. If you want to see some other methods, I'd recommend taking a look at a tutorial at digital Photography School entitled How to Convert Color Digital Images into Black and White Ones, or at another one from GimpGuru.org entitled Converting Color Images to B&W using the GIMP. Both of these detail several different methods, all with their own merits.
I've been researching the subject quite a bit, and I think I've settled on a favorite method of my own, and I'm going to detail it for you now. We'll be using lessons learned in the last couple of posts on luminosity masking, so if you haven't read those yet, you might want to at least skim them to get the idea.
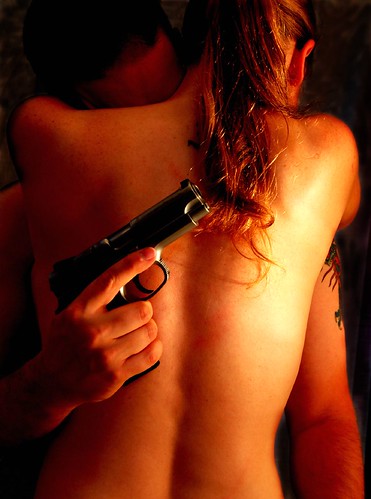
The photograph for today is another CC licensed shot, originally posted to flickr by user J. Star. Thank you J. for this truly amazing photograph.
Okay, let's get on with it.
- The first thing we're going to do is decompose to LAB to get the luminosity layer, so click Image>Mode>Decompose. Select LAB, make sure decompose to layers is checked, and click OK.

Discard the A and B layers, and just set that aside for a few minutes. - Go back to the original color shot and click Filters>Colors>Channel Mixer. Check both of the boxes for Monochrome and Preserve luminosity.
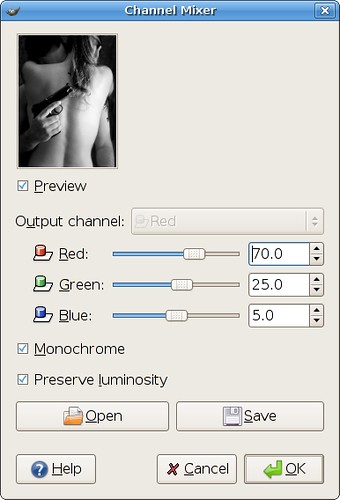
You do not actually have to check the preserve luminosity box. What this box is supposed to do is make the sliders dynamically adjust so they all add up to 100%. I have not found this to be the case, but maybe I'm just doing it wrong. If anyone can shed some light on that subject, I'd be very appreciative. I recommend checking it anyway just to be sure. - Step three is highly subjective, and will probably differ from image to image, so use your judgement here and pick values that look good to you. I'm picking Red - 70, Green - 25, and Blue - 5. I'm doing this because there's obviously a lot of red, not much green and very little blue in this photograph.
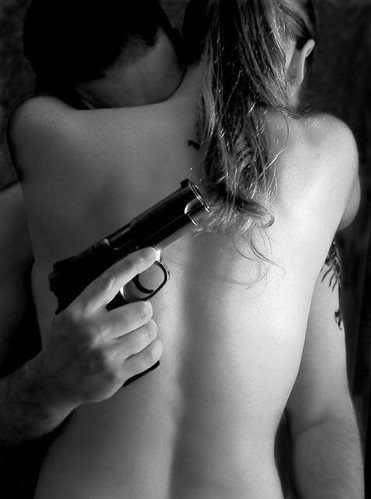
- You may at this point decide that you are finished. The channel mixer is a pretty powerful tool, and you can get very good results with it. I personally think the highlights on her back are a little too high, and the darkness on the back of his hand is a little too dark, so I'm going to use that luminosity layer to create some masks and adjust those areas a bit. Please see Monday's post on luminosity masking to get an idea on how to do that.
I hope you've enjoyed this tutorial. Please remember there are many many ways to convert photographs from color to black and white, and I highly encourage you to research the subject to find your method of choice. Thank you for following along.
Edit: I realize the EXIF data on the photograph says it was edited with Photoshop Elements 3.0. I assure you that was done by the original artist. All the work done in this tutorial is done in the Gimp.


9 comments:
If you want a simple method to do this, just use 'Image->Mode->Grayscale'
That's all!
While it is true that you can get a black and white copy of the image using this method, many people find that the contrast is far from desirable, and that much detail is lost in the shadows and highlights. Give it a try using the original image in this post and compare it to my black and white final. You'll see what I mean.
thanks for this site.
nicoladimaria.info
I'm a little unclear on what you're doing with that LAB decomposition. More detail there would be welcome I think.
Good to know about the channel mixer - that is much better than a simple desaturation or mode change and I didn't know about that. Thanks.
Paul, welcome back, and thanks for the comment. To be more clear, I am completely discarding the Alpha (A) and Brightness (B) layers and using the luminosity (L) layer from the LAB decomposition to create a luminosity mask. You should visit the linked post to learn more about it.
I am glad to hear you like the channel mixer. In my opinion the preview area should be bigger, but it is better than nothing.
Thank for your tutorial.
I've some problem find the options because I use a localized version of gimp. Is there a way to run gimp (only gimp) with english language? is there an options when I run it?
酒店喝酒,禮服店,酒店小姐,制服店,便服店,鋼琴酒吧,酒店兼職,酒店兼差,酒店打工,伴唱小姐,暑假打工,酒店上班,酒店兼職,ktv酒店,酒店,酒店公關,酒店兼差,酒店上班,酒店打工,禮服酒店,禮服店,酒店小姐,酒店兼差,寒暑假打工,酒店小姐,台北酒店,禮服店 ,酒店小姐,酒店經紀,酒店兼差,寒暑假打工,酒店小姐,台北酒店,禮服店 ,酒店小姐,酒店經紀,酒店兼差,寒暑假打工,酒店小姐,台北酒店,禮服店 ,酒店小姐,酒店經紀,酒店兼差,寒暑假打工,台北酒店,禮服店 ,酒店小姐,酒店經紀,酒店兼差,寒暑假打工,酒店小姐,台北酒店,禮服店 ,酒店小姐,酒店兼差,寒暑假打工,酒店小姐,台北酒店,禮服店 ,酒店小姐,酒店經紀,酒店兼差,寒暑假打工,酒店小姐,台北酒店,禮服店 ,酒店小姐,酒店經紀,酒店兼差,寒暑假打工,酒店小姐,台北酒店,禮服店 ,酒店小姐,酒店經紀,酒店兼差,寒暑假打工,酒店小姐,台北酒店,禮服店 ,酒店小姐,酒店經紀,酒店兼差,寒暑假打工,酒店小姐,禮服店 ,酒店小姐,酒店經紀,酒店兼差,寒暑假打工,酒店小姐,禮服店 ,酒店小姐,酒店經紀,酒店兼差,寒暑假打工,酒店小姐,禮服店 ,酒店小姐,酒店經紀,酒店兼差,寒暑假打工,酒店小姐,禮服店 ,酒店小姐,酒店經紀,酒店兼差,寒暑假打工,酒店小姐,酒店傳播,酒店經紀人,酒店,酒店,酒店,酒店 ,禮服店 , 酒店小姐,酒店經紀,酒店兼差,寒暑假打工,招待所,酒店小姐,酒店兼差,寒暑假打工,酒店上班,暑假打工,酒店公關,酒店兼職,禮服店 , 酒店小姐 ,酒店經紀 ,酒店兼差,寒暑假打工,酒店,酒店,酒店經紀,
酒店喝酒,禮服店,酒店小姐,制服店,便服店,鋼琴酒吧,酒店兼職,酒店兼差,酒店打工,伴唱小姐,暑假打工,酒店上班,酒店兼職,ktv酒店,酒店,酒店公關,酒店兼差,酒店上班,酒店打工,禮服酒店,禮服店,酒店小姐,酒店兼差,寒暑假打工,酒店小姐,台北酒店,禮服店 ,酒店小姐,酒店經紀,酒店兼差,寒暑假打工,酒店小姐,台北酒店,禮服店 ,酒店小姐,酒店經紀,酒店兼差,寒暑假打工,酒店小姐,台北酒店,禮服店 ,酒店小姐,酒店經紀,酒店兼差,寒暑假打工,台北酒店,禮服店 ,酒店小姐,酒店經紀,酒店兼差,寒暑假打工,酒店小姐,台北酒店,禮服店 ,酒店小姐,酒店兼差,寒暑假打工,酒店小姐,台北酒店,禮服店 ,酒店小姐,酒店經紀,酒店兼差,寒暑假打工,酒店小姐,台北酒店,禮服店 ,酒店小姐,酒店經紀,酒店兼差,寒暑假打工,酒店小姐,台北酒店,禮服店 ,酒店小姐,酒店經紀,酒店兼差,寒暑假打工,酒店小姐,台北酒店,禮服店 ,酒店小姐,酒店經紀,酒店兼差,寒暑假打工,酒店小姐,禮服店 ,酒店小姐,酒店經紀,酒店兼差,寒暑假打工,酒店小姐,禮服店 ,酒店小姐,酒店經紀,酒店兼差,寒暑假打工,酒店小姐,禮服店 ,酒店小姐,酒店經紀,酒店兼差,寒暑假打工,酒店小姐,禮服店 ,酒店小姐,酒店經紀,酒店兼差,寒暑假打工,酒店小姐,酒店傳播,酒店經紀人,酒店,酒店,酒店,酒店 ,禮服店 , 酒店小姐,酒店經紀,酒店兼差,寒暑假打工,招待所,酒店小姐,酒店兼差,寒暑假打工,酒店上班,暑假打工,酒店公關,酒店兼職,禮服店 , 酒店小姐 ,酒店經紀 ,酒店兼差,寒暑假打工,酒店,酒店,酒店經紀,
Great post,Thanks for providing us this great knowledge,Keep it up.
A good blog.
---
five nights at freddy's | five nights at freddy's download | fnaf
Post a Comment