Web 2.0 Violators
Please note, there is now an Inkscape version of this tutorial available.
For this tutorial, I'm going to adapt Ajax Lessons: Web 2.0 Badge Photoshop Tutorial.
- Open a new file, 200px by 200px with a white background layer.
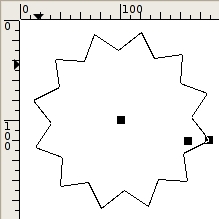
- Open the GFig dialog by clicking Filter>Render>GFig...
- Select the "Create star" tool, set the number of sides to 12, uncheck the "Stroke" checkbox, select "Color Fill" from the drop-down menu and select white for your color from the color picker.

- In the drawing area of the GFig window, starting at the center, click and drag to the outside creating a star shape that almost fills the window. Leave some room on the outside for the border and drop shadow later.
- Select the "Move a single point" tool in the GFig toolbar, grab the middle handle, and drag it toward the outside to increase the angle of the points. You can also use this tool to move the outside point if you want to rotate your shape. When you're happy with the shape, click Close. You should now have a GFig layer above your Background layer in the layer stack. Rename this layer "Border".
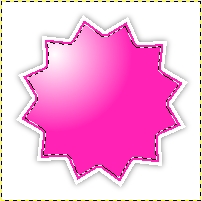
- Making sure the Border layer is active, select the "Select regions by color" tool from the toolbox, make sure the Feather checkbox is unchecked and click in the center of the drawing window. You should have a hard edged selection the shape of your star.
- Click Select>Shrink... and shrink the selection by 2 pixels. Create a new layer above the Border layer and name it Color. Select a color you want the violator to be from the color picker, and fill the selection with it.
- Activate the Border layer again, and select the colored regions like you did in step 6. Create a new layer called "Shadow" and position it under the Border layer and above the Background layer.
- Click Select>Feather... and feather the selection by 10 pixels. Making sure the Shadow layer is active, fill the selection with black, and drop the opacity of the layer to 50.

- Activate the Color layer, and select the colored regions like you did in step 6 and 8. Click Select>Shrink... and shrink the selection by 2px.
- Create a new layer above all the others and name it Gradient. Select the Gradient tool from the toolbox, set your foreground color to white, select the FG to Transparent gradient, set the shape to Radial, and create a gradient in the upper left area of the selection. Personally I think the white is a little too harsh, but we'll keep it as is for the sake of direct translation.
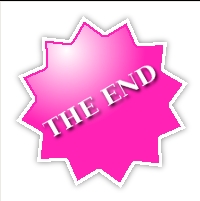
- Select the Text tool, pick a font you like and enter some text. I couldn't find the font they used, so I just used Rasheeq-Bold. To rotate, select the rotate tool, and just click and drag around the text until you have an angle you like.
- For the final step, we'll add a drop shadow to the text by clicking Script-fu>Shadow>Drop shadow... Set the X and Y offset to 2 and the blur radius to 4 and the opacity to 80 and click OK.
That's it! I hope you enjoyed this tutorial and found it to be a good translation of the original. The comment board is open, so drop me a note. Thanks!


5 comments:
Hey, translating the ps tutorials is a real great idea!
thanks a lot!!!!!
Hi, this is great tutorial. Thanks!
Thanks for sharing your ideas - works great for me !!
You have help me out a treat !
thanks
Alex
Within theBuy rs gold attracting the main GFig window, starting off with the center, just click in addition to get facing outward setting up a superstar condition that nearly fulfills the window. Leave some space externally with the perimeter in addition to lower Cheapest Diablo 3 golddarkness after.
This tutorial is very helpful for creating badges.
Post a Comment